Installation
Installation of Photini is done in two parts - first install Python, then use Python to install and run Photini.
Installing Python
Python is absolutely essential to run Photini. It is already installed on many computers, but on Windows you will probably need to install it yourself.
Python should already be installed, but make sure you have Python 3.
Open a terminal window and run the python3 command:
jim@mint22:~$ python3 -V
Python 3.12.3
Note that the command is python3.
On some machines the python command still runs Python 2.
If you do not have Python 3 installed then use your operating system’s package manager to install it.
You should also check what version of pip is installed:
jim@mint22:~$ pip3 show pip
Name: pip
Version: 24.0
Summary: The PyPA recommended tool for installing Python packages.
Home-page:
Author:
Author-email: The pip developers <distutils-sig@python.org>
License: MIT
Location: /usr/lib/python3/dist-packages
Requires:
Required-by:
Although pip is a Python package manager it should not be used to install packges under /usr/lib/.
This system directory should only be used by the operating system’s package manager.
With recent Python and pip versions you have to use a virtual environment to install other packages such as Photini.
I suggest reading Using Python on Windows before you begin. Go to https://www.python.org/downloads/windows/ and choose a suitable Python 3 installer. Use the 64-bit stable release with the highest version number that will run on your version of Windows. Beware of using very new releases though, as some of Photini’s dependencies may not have been updated to work with the latest Python.
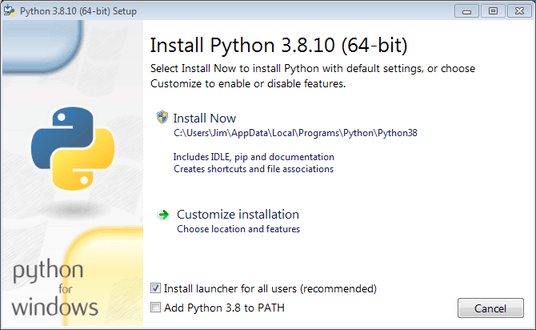
The first main installer screen should have an option to customise the installation. I recommend choosing this and selecting the following options.
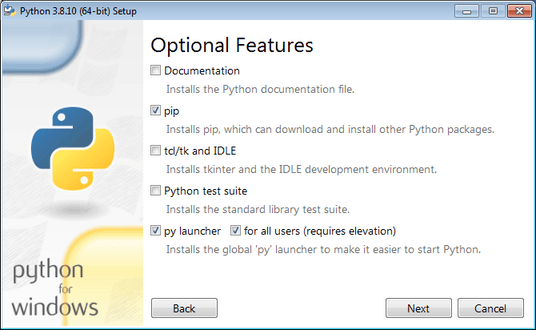
Documentation: If you are installing Python only to run Photini then you don’t really need the Python documentation.
pip: You definitely need this!
tcl/tk and IDLE: not needed unless you want to edit Python files.
Python test suite: not needed.
py launcher: I recommend installing the launcher for all users.
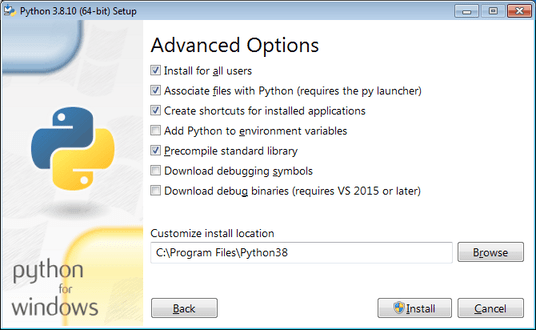
Install for all users: this is almost essential if you’d like to share one installation of Photini between two or more users. I also recommend it for single users as it helps keep your Python installation separate from your Photini installation.
Associate files with Python: recommended.
Create shortcuts for installed applications: optional.
Add Python to environment variables: I don’t recommend this. The py launcher (previous screen) is a cleaner way to run Python than adding things to your PATH environment variable.
Precompile standard library: recommended.
Download debugging symbols: not needed.
Download debug binaries: not needed.
After installing Python, start a command window such as cmd.exe.
Now try running the py launcher:
C:\Users\Jim>py --list
Installed Pythons found by py Launcher for Windows
 -3.8-64 *
This shows that Python 3.8 is installed and available.
Now try running pip.
Note the use of py to run pip, instead of requiring the Python scripts directory to be on your PATH:
C:\Users\Jim>py -m pip show pip
Name: pip
Version: 21.1.1
Summary: The PyPA recommended tool for installing Python packages.
Home-page: https://pip.pypa.io/
Author: The pip developers
Author-email: distutils-sig@python.org
License: MIT
Location: c:\program files\python38\lib\site-packages
Requires:
Required-by:
This shows that pip is installed in c:\program files\python38\lib\site-packages, which is only writeable with administrator privileges.
If you install packages with pip as a normal user (i.e. without administrator privileges) it will put them under your “roaming” application data directory, e.g. c:\users\jim\appdata\roaming\python\python38\site-packages.
I think this is a curious choice of location and strongly recommend using a “virtual environment” to install Photini and its dependencies in your choice of location.
The following instructions assume a virtual environment is in use and activated.
If you don’t use a virtual environment then replace python with py and pip with py -m pip.
Installing Photini
Before installing Photini you need to decide if you are installing it for a single user or for multiple users. Multi-user installations use a Python virtual environment to create a self contained installation that can easily be shared. Using a virtual environment has other advantages, such as easy uninstallation, so I also recommend using it for a single user installation.
Linux & MacOS users have another decision to make - whether to install Photini’s dependencies with pip or with the operating system’s package manager. For a good introduction to the advantages and disadvantages of each I suggest reading Managing Python packages the right way. All of Photini’s dependencies can be installed with pip, but I recommend installing PySide6 / PySide2 / PyQt6 / PyQt5 (whichever is available) with the package manager to ensure you install all of its system libraries and plugins, and so that you get the same GUI style as other Qt based applications. (Don’t forget to install the QtWebEngine stuff as well if it’s in a seaprate package.)
Virtual environment
If you are using a virtual environment you should set it up now.
You can create a virtual environment in any writeable directory.
I use the name photini and create it in my home directory:
jim@mint22:~$ python3 -m venv photini --system-site-packages
jim@mint22:~$ source photini/bin/activate
(photini) jim@mint22:~$ python -m pip install -U pip
Requirement already satisfied: pip in ./photini/lib/python3.12/site-packages (24.0)
Collecting pip
  Downloading pip-24.2-py3-none-any.whl.metadata (3.6 kB)
Downloading pip-24.2-py3-none-any.whl (1.8 MB)
   ━━━━━━━━━━━━━━━━━━━━━━━━━━━━━━━━━━━━━━━━ 1.8/1.8 MB 694.4 kB/s eta 0:00:00
Installing collected packages: pip
  Attempting uninstall: pip
    Found existing installation: pip 24.0
    Uninstalling pip-24.0:
      Successfully uninstalled pip-24.0
Successfully installed pip-24.2
The option --system-site-packages makes packages installed with the system package manager (e.g. PyQt6) available within the virtual environment.
C:\Users\Jim>py -m venv photini

C:\Users\Jim>photini\Scripts\activate.bat

(photini) C:\Users\Jim>python -m pip install -U pip
Requirement already satisfied: pip in c:\users\jim\photini\lib\site-packages (21.1.1)
Collecting pip
  Downloading pip-24.2-py3-none-any.whl (1.8 MB)
     |████████████████████████████████| 1.8 MB 1.7 MB/s
Installing collected packages: pip
  Attempting uninstall: pip
    Found existing installation: pip 21.1.1
    Uninstalling pip-21.1.1:
      Successfully uninstalled pip-21.1.1
Successfully installed pip-24.2
Note that after activating the virtual environment the py command is not needed.
Python, pip, and other Python based commands are run directly.
After creating the virtual environment you should update pip as shown above.
This ensures that the latest version will be used to install Photini.
You should stay in this virtual environment while installing and testing Photini. After that Photini can be run without activating the virtual environment.
Qt package
Photini uses the Qt Framework for its graphical user interface. There are two current versions of Qt (Qt5 and Qt6) and each has two Python interfaces (PyQt and PySide). Hence there are four Python Qt packages - PyQt5, PyQt6, PySide2, and PySide6. Photini works with any one of these, but there isn’t one of them that works on all platforms. For example, Qt6 does not work on Windows versions earlier than Windows 10.
I recommend PyQt rather than PySide, and Qt6 rather than Qt5. However, if your operating system already has one of the packages installed then there’s probably no reason to use any other.
If you install more than one Qt package you can choose which one Photini uses in its configuration. This allows you to try each until you find one that works satisfactorily on your computer.
“Extras”
Photini has a number of optional extras that can be installed with pip. These are:
flickr: Enable uploading pictures to Flickr.
ipernity: Enable uploading pictures to Ipernity.
pixelfed: Enable uploading pictures to Pixelfed or Mastodon.
importer: Import photos directly from a camera (not available on Windows).
spelling: Install a spell checker for Photini’s text entry fields.
gpxpy: Allow importing of GPS data from a phone tracking app or similar.
all: All of the above.
You can also choose to install one or more Qt packages:
pyqt5
pyqt6
pyside2
pyside6
The extras are listed in square brackets when running pip. For example:
pip install photini[pyqt6,spelling,gpxpy]
Note that the extras’ names are not case sensitive.
Initial installation
Firstly install Photini and any required extras with pip. Make sure you include at least one Qt package:
(photini) jim@mint22:~$ pip install photini[pyqt5,gpxpy,spelling]
Collecting photini[gpxpy,pyqt5,spelling]
  Downloading Photini-2024.8.2-py3-none-any.whl.metadata (11 kB)
Collecting appdirs>=1.3 (from photini[gpxpy,pyqt5,spelling])
  Downloading appdirs-1.4.4-py2.py3-none-any.whl.metadata (9.0 kB)
Collecting cachetools>=3.0 (from photini[gpxpy,pyqt5,spelling])
  Downloading cachetools-5.5.0-py3-none-any.whl.metadata (5.3 kB)
Requirement already satisfied: chardet>=3.0 in /usr/lib/python3/dist-packages (from photini[gpxpy,pyqt5,spelling]) (5.2.0)
Collecting exiv2>=0.16 (from photini[gpxpy,pyqt5,spelling])
  Downloading exiv2-0.17.0-cp312-cp312-manylinux_2_28_x86_64.whl.metadata (7.1 kB)
Requirement already satisfied: filetype>=1.0 in /usr/lib/python3/dist-packages (from photini[gpxpy,pyqt5,spelling]) (1.2.0)
Requirement already satisfied: Pillow>=2.0 in /usr/lib/python3/dist-packages (from photini[gpxpy,pyqt5,spelling]) (10.2.0)
Requirement already satisfied: requests>=2.4 in /usr/lib/python3/dist-packages (from photini[gpxpy,pyqt5,spelling]) (2.31.0)
Requirement already satisfied: PyQt5>=5.9 in /usr/lib/python3/dist-packages (from photini[gpxpy,pyqt5,spelling]) (5.15.10)
Requirement already satisfied: PyQtWebEngine>=5.12 in /usr/lib/python3/dist-packages (from photini[gpxpy,pyqt5,spelling]) (5.15.6)
Collecting gpxpy!=1.6.0,>=1.3.5 (from photini[gpxpy,pyqt5,spelling])
  Downloading gpxpy-1.6.2-py3-none-any.whl.metadata (5.9 kB)
Collecting pyenchant>=2.0 (from photini[gpxpy,pyqt5,spelling])
  Downloading pyenchant-3.2.2-py3-none-any.whl.metadata (3.8 kB)
Requirement already satisfied: PyQt5-sip<13,>=12.13 in /usr/lib/python3/dist-packages (from PyQt5>=5.9->photini[gpxpy,pyqt5,spelling]) (12.13.0)
Downloading appdirs-1.4.4-py2.py3-none-any.whl (9.6 kB)
Downloading cachetools-5.5.0-py3-none-any.whl (9.5 kB)
Downloading exiv2-0.17.0-cp312-cp312-manylinux_2_28_x86_64.whl (15.3 MB)
   ━━━━━━━━━━━━━━━━━━━━━━━━━━━━━━━━━━━━━━━━ 15.3/15.3 MB 852.8 kB/s eta 0:00:00
Downloading gpxpy-1.6.2-py3-none-any.whl (42 kB)
Downloading pyenchant-3.2.2-py3-none-any.whl (55 kB)
Downloading Photini-2024.8.2-py3-none-any.whl (418 kB)
Installing collected packages: exiv2, appdirs, pyenchant, gpxpy, cachetools, photini
Successfully installed appdirs-1.4.4 cachetools-5.5.0 exiv2-0.17.0 gpxpy-1.6.2 photini-2024.8.2 pyenchant-3.2.2
(photini) C:\Users\Jim>pip install photini[pyqt5,gpxpy,spelling]
Collecting photini[gpxpy,pyqt5,spelling]
  Downloading Photini-2024.8.2-py3-none-any.whl.metadata (11 kB)
Collecting appdirs>=1.3 (from photini[gpxpy,pyqt5,spelling])
  Downloading appdirs-1.4.4-py2.py3-none-any.whl.metadata (9.0 kB)
Collecting cachetools>=3.0 (from photini[gpxpy,pyqt5,spelling])
  Downloading cachetools-5.5.0-py3-none-any.whl.metadata (5.3 kB)
Collecting chardet>=3.0 (from photini[gpxpy,pyqt5,spelling])
  Downloading chardet-5.2.0-py3-none-any.whl.metadata (3.4 kB)
Collecting exiv2>=0.16 (from photini[gpxpy,pyqt5,spelling])
  Downloading exiv2-0.17.0-cp38-cp38-win_amd64.whl.metadata (7.3 kB)
Collecting filetype>=1.0 (from photini[gpxpy,pyqt5,spelling])
  Downloading filetype-1.2.0-py2.py3-none-any.whl.metadata (6.5 kB)
Collecting Pillow>=2.0 (from photini[gpxpy,pyqt5,spelling])
  Downloading pillow-10.4.0-cp38-cp38-win_amd64.whl.metadata (9.3 kB)
Collecting requests>=2.4 (from photini[gpxpy,pyqt5,spelling])
  Downloading requests-2.32.3-py3-none-any.whl.metadata (4.6 kB)
Collecting PyQt5>=5.9 (from photini[gpxpy,pyqt5,spelling])
  Downloading PyQt5-5.15.11-cp38-abi3-win_amd64.whl.metadata (2.1 kB)
Collecting PyQtWebEngine>=5.12 (from photini[gpxpy,pyqt5,spelling])
  Downloading PyQtWebEngine-5.15.7-cp38-abi3-win_amd64.whl.metadata (1.9 kB)
Collecting pyenchant>=2.0 (from photini[gpxpy,pyqt5,spelling])
  Downloading pyenchant-3.2.2-py3-none-win_amd64.whl.metadata (3.8 kB)
Collecting gpxpy!=1.6.0,>=1.3.5 (from photini[gpxpy,pyqt5,spelling])
  Downloading gpxpy-1.6.2-py3-none-any.whl.metadata (5.9 kB)
Collecting PyQt5-sip<13,>=12.15 (from PyQt5>=5.9->photini[gpxpy,pyqt5,spelling])
  Downloading PyQt5_sip-12.15.0-cp38-cp38-win_amd64.whl.metadata (439 bytes)
Collecting PyQt5-Qt5<5.16.0,>=5.15.2 (from PyQt5>=5.9->photini[gpxpy,pyqt5,spelling])
  Downloading PyQt5_Qt5-5.15.2-py3-none-win_amd64.whl.metadata (552 bytes)
Collecting PyQtWebEngine-Qt5<5.16.0,>=5.15.0 (from PyQtWebEngine>=5.12->photini[gpxpy,pyqt5,spelling])
  Downloading PyQtWebEngine_Qt5-5.15.2-py3-none-win_amd64.whl.metadata (584 bytes)
Collecting charset-normalizer<4,>=2 (from requests>=2.4->photini[gpxpy,pyqt5,spelling])
  Downloading charset_normalizer-3.3.2-cp38-cp38-win_amd64.whl.metadata (34 kB)
Collecting idna<4,>=2.5 (from requests>=2.4->photini[gpxpy,pyqt5,spelling])
  Downloading idna-3.8-py3-none-any.whl.metadata (9.9 kB)
Collecting urllib3<3,>=1.21.1 (from requests>=2.4->photini[gpxpy,pyqt5,spelling])
  Downloading urllib3-2.2.3-py3-none-any.whl.metadata (6.5 kB)
Collecting certifi>=2017.4.17 (from requests>=2.4->photini[gpxpy,pyqt5,spelling])
  Downloading certifi-2024.8.30-py3-none-any.whl.metadata (2.2 kB)
Downloading appdirs-1.4.4-py2.py3-none-any.whl (9.6 kB)
Downloading cachetools-5.5.0-py3-none-any.whl (9.5 kB)
Downloading chardet-5.2.0-py3-none-any.whl (199 kB)
Downloading exiv2-0.17.0-cp38-cp38-win_amd64.whl (8.5 MB)
   ---------------------------------------- 8.5/8.5 MB 453.3 kB/s eta 0:00:00
Downloading filetype-1.2.0-py2.py3-none-any.whl (19 kB)
Downloading gpxpy-1.6.2-py3-none-any.whl (42 kB)
Downloading pillow-10.4.0-cp38-cp38-win_amd64.whl (2.6 MB)
   ---------------------------------------- 2.6/2.6 MB 457.0 kB/s eta 0:00:00
Downloading pyenchant-3.2.2-py3-none-win_amd64.whl (11.9 MB)
   ---------------------------------------- 11.9/11.9 MB 393.6 kB/s eta 0:00:00
Downloading PyQt5-5.15.11-cp38-abi3-win_amd64.whl (6.9 MB)
   ---------------------------------------- 6.9/6.9 MB 411.9 kB/s eta 0:00:00
Downloading PyQtWebEngine-5.15.7-cp38-abi3-win_amd64.whl (184 kB)
Downloading requests-2.32.3-py3-none-any.whl (64 kB)
Downloading Photini-2024.8.2-py3-none-any.whl (418 kB)
Downloading certifi-2024.8.30-py3-none-any.whl (167 kB)
Downloading charset_normalizer-3.3.2-cp38-cp38-win_amd64.whl (99 kB)
Downloading idna-3.8-py3-none-any.whl (66 kB)
Downloading PyQt5_Qt5-5.15.2-py3-none-win_amd64.whl (50.1 MB)
   ---------------------------------------- 50.1/50.1 MB 439.4 kB/s eta 0:00:00
Downloading PyQt5_sip-12.15.0-cp38-cp38-win_amd64.whl (59 kB)
Downloading PyQtWebEngine_Qt5-5.15.2-py3-none-win_amd64.whl (60.0 MB)
   ---------------------------------------- 60.0/60.0 MB 399.9 kB/s eta 0:00:00
Downloading urllib3-2.2.3-py3-none-any.whl (126 kB)
Installing collected packages: PyQtWebEngine-Qt5, PyQt5-Qt5, filetype, exiv2, appdirs, urllib3, PyQt5-sip, pyenchant, Pillow, idna, gpxpy, charset-normalizer, chardet, certifi, cachetools, requests, PyQt5, PyQtWebEngine, photini
Successfully installed Pillow-10.4.0 PyQt5-5.15.11 PyQt5-Qt5-5.15.2 PyQt5-sip-12.15.0 PyQtWebEngine-5.15.7 PyQtWebEngine-Qt5-5.15.2 appdirs-1.4.4 cachetools-5.5.0 certifi-2024.8.30 chardet-5.2.0 charset-normalizer-3.3.2 exiv2-0.17.0 filetype-1.2.0 gpxpy-1.6.2 idna-3.8 photini-2024.8.2 pyenchant-3.2.2 requests-2.32.3 urllib3-2.2.3
Test the installation
Now you should be able to run photini:
(photini) jim@mint22:~$ python -m photini
ffmpeg or ffprobe not found
No module named 'requests_oauthlib'
No module named 'requests_toolbelt'
No module named 'requests_oauthlib'
No module named 'requests_oauthlib'
(photini) C:\Users\Jim>python -m photini
ffmpeg or ffprobe not found
No module named 'requests_oauthlib'
No module named 'requests_toolbelt'
No module named 'requests_oauthlib'
No module named 'requests_oauthlib'
Photini should run successfully, but it lists some optional dependencies that are not installed. These provide additional features, for example the Flickr uploader, that not all users will need to install.
Missing system packages
On some Linux systems (e.g. Ubuntu, Debian, Mint) Photini may still not run if you’ve installed a Qt package with pip instead of the system’s package manager.
In this case it may be worth doing a web search for the error messages you get.
For example, failing to load a Qt plugin (on Debian) can be cured by installing just one system package (libxcb-xinerama0) but the error message doesn’t tell you that!
Optional dependencies
If you’d like to add any of the “extras” listed earlier to your Photini installation, you just need to run pip again:
(photini) jim@mint22:~$ pip install photini[flickr]
Requirement already satisfied: photini[flickr] in ./photini/lib/python3.12/site-packages (2024.8.2)
Requirement already satisfied: appdirs>=1.3 in ./photini/lib/python3.12/site-packages (from photini[flickr]) (1.4.4)
Requirement already satisfied: cachetools>=3.0 in ./photini/lib/python3.12/site-packages (from photini[flickr]) (5.5.0)
Requirement already satisfied: chardet>=3.0 in /usr/lib/python3/dist-packages (from photini[flickr]) (5.2.0)
Requirement already satisfied: exiv2>=0.16 in ./photini/lib/python3.12/site-packages (from photini[flickr]) (0.17.0)
Requirement already satisfied: filetype>=1.0 in /usr/lib/python3/dist-packages (from photini[flickr]) (1.2.0)
Requirement already satisfied: Pillow>=2.0 in /usr/lib/python3/dist-packages (from photini[flickr]) (10.2.0)
Requirement already satisfied: requests>=2.4 in /usr/lib/python3/dist-packages (from photini[flickr]) (2.31.0)
Collecting keyring>=7.0 (from photini[flickr])
  Downloading keyring-25.3.0-py3-none-any.whl.metadata (20 kB)
Collecting requests-oauthlib>=1.0 (from photini[flickr])
  Downloading requests_oauthlib-2.0.0-py2.py3-none-any.whl.metadata (11 kB)
Collecting requests-toolbelt>=0.9 (from photini[flickr])
  Downloading requests_toolbelt-1.0.0-py2.py3-none-any.whl.metadata (14 kB)
Collecting jaraco.classes (from keyring>=7.0->photini[flickr])
  Downloading jaraco.classes-3.4.0-py3-none-any.whl.metadata (2.6 kB)
Collecting jaraco.functools (from keyring>=7.0->photini[flickr])
  Downloading jaraco.functools-4.0.2-py3-none-any.whl.metadata (2.8 kB)
Collecting jaraco.context (from keyring>=7.0->photini[flickr])
  Downloading jaraco.context-6.0.1-py3-none-any.whl.metadata (4.1 kB)
Collecting SecretStorage>=3.2 (from keyring>=7.0->photini[flickr])
  Downloading SecretStorage-3.3.3-py3-none-any.whl.metadata (4.0 kB)
Collecting jeepney>=0.4.2 (from keyring>=7.0->photini[flickr])
  Downloading jeepney-0.8.0-py3-none-any.whl.metadata (1.3 kB)
Requirement already satisfied: oauthlib>=3.0.0 in /usr/lib/python3/dist-packages (from requests-oauthlib>=1.0->photini[flickr]) (3.2.2)
Requirement already satisfied: cryptography>=2.0 in /usr/lib/python3/dist-packages (from SecretStorage>=3.2->keyring>=7.0->photini[flickr]) (41.0.7)
Collecting more-itertools (from jaraco.classes->keyring>=7.0->photini[flickr])
  Downloading more_itertools-10.5.0-py3-none-any.whl.metadata (36 kB)
Downloading keyring-25.3.0-py3-none-any.whl (38 kB)
Downloading requests_oauthlib-2.0.0-py2.py3-none-any.whl (24 kB)
Downloading requests_toolbelt-1.0.0-py2.py3-none-any.whl (54 kB)
Downloading jeepney-0.8.0-py3-none-any.whl (48 kB)
Downloading SecretStorage-3.3.3-py3-none-any.whl (15 kB)
Downloading jaraco.classes-3.4.0-py3-none-any.whl (6.8 kB)
Downloading jaraco.context-6.0.1-py3-none-any.whl (6.8 kB)
Downloading jaraco.functools-4.0.2-py3-none-any.whl (9.9 kB)
Downloading more_itertools-10.5.0-py3-none-any.whl (60 kB)
Installing collected packages: requests-toolbelt, requests-oauthlib, more-itertools, jeepney, jaraco.context, SecretStorage, jaraco.functools, jaraco.classes, keyring
Successfully installed SecretStorage-3.3.3 jaraco.classes-3.4.0 jaraco.context-6.0.1 jaraco.functools-4.0.2 jeepney-0.8.0 keyring-25.3.0 more-itertools-10.5.0 requests-oauthlib-2.0.0 requests-toolbelt-1.0.0
(photini) C:\Users\Jim>pip install photini[flickr]
Requirement already satisfied: photini[flickr] in c:\users\jim\photini\lib\site-packages (2024.8.2)
Requirement already satisfied: appdirs>=1.3 in c:\users\jim\photini\lib\site-packages (from photini[flickr]) (1.4.4)
Requirement already satisfied: cachetools>=3.0 in c:\users\jim\photini\lib\site-packages (from photini[flickr]) (5.5.0)
Requirement already satisfied: chardet>=3.0 in c:\users\jim\photini\lib\site-packages (from photini[flickr]) (5.2.0)
Requirement already satisfied: exiv2>=0.16 in c:\users\jim\photini\lib\site-packages (from photini[flickr]) (0.17.0)
Requirement already satisfied: filetype>=1.0 in c:\users\jim\photini\lib\site-packages (from photini[flickr]) (1.2.0)
Requirement already satisfied: Pillow>=2.0 in c:\users\jim\photini\lib\site-packages (from photini[flickr]) (10.4.0)
Requirement already satisfied: requests>=2.4 in c:\users\jim\photini\lib\site-packages (from photini[flickr]) (2.32.3)
Requirement already satisfied: charset-normalizer<4,>=2 in c:\users\jim\photini\lib\site-packages (from requests>=2.4->photini[flickr]) (3.3.2)
Requirement already satisfied: idna<4,>=2.5 in c:\users\jim\photini\lib\site-packages (from requests>=2.4->photini[flickr]) (3.8)
Requirement already satisfied: urllib3<3,>=1.21.1 in c:\users\jim\photini\lib\site-packages (from requests>=2.4->photini[flickr]) (2.2.3)
Requirement already satisfied: certifi>=2017.4.17 in c:\users\jim\photini\lib\site-packages (from requests>=2.4->photini[flickr]) (2024.8.30)
Collecting keyring>=7.0 (from photini[flickr])
  Downloading keyring-25.3.0-py3-none-any.whl.metadata (20 kB)
Collecting requests-toolbelt>=0.9 (from photini[flickr])
  Downloading requests_toolbelt-1.0.0-py2.py3-none-any.whl.metadata (14 kB)
Collecting requests-oauthlib>=1.0 (from photini[flickr])
  Downloading requests_oauthlib-2.0.0-py2.py3-none-any.whl.metadata (11 kB)
Collecting jaraco.classes (from keyring>=7.0->photini[flickr])
  Downloading jaraco.classes-3.4.0-py3-none-any.whl.metadata (2.6 kB)
Collecting jaraco.functools (from keyring>=7.0->photini[flickr])
  Downloading jaraco.functools-4.0.2-py3-none-any.whl.metadata (2.8 kB)
Collecting jaraco.context (from keyring>=7.0->photini[flickr])
  Downloading jaraco.context-6.0.1-py3-none-any.whl.metadata (4.1 kB)
Collecting importlib-metadata>=4.11.4 (from keyring>=7.0->photini[flickr])
  Downloading importlib_metadata-8.5.0-py3-none-any.whl.metadata (4.8 kB)
Collecting importlib-resources (from keyring>=7.0->photini[flickr])
  Downloading importlib_resources-6.4.5-py3-none-any.whl.metadata (4.0 kB)
Collecting pywin32-ctypes>=0.2.0 (from keyring>=7.0->photini[flickr])
  Downloading pywin32_ctypes-0.2.3-py3-none-any.whl.metadata (3.9 kB)
Collecting oauthlib>=3.0.0 (from requests-oauthlib>=1.0->photini[flickr])
  Downloading oauthlib-3.2.2-py3-none-any.whl.metadata (7.5 kB)
Collecting zipp>=3.20 (from importlib-metadata>=4.11.4->keyring>=7.0->photini[flickr])
  Downloading zipp-3.20.1-py3-none-any.whl.metadata (3.7 kB)
Collecting more-itertools (from jaraco.classes->keyring>=7.0->photini[flickr])
  Downloading more_itertools-10.5.0-py3-none-any.whl.metadata (36 kB)
Collecting backports.tarfile (from jaraco.context->keyring>=7.0->photini[flickr])
  Downloading backports.tarfile-1.2.0-py3-none-any.whl.metadata (2.0 kB)
Downloading keyring-25.3.0-py3-none-any.whl (38 kB)
Downloading requests_oauthlib-2.0.0-py2.py3-none-any.whl (24 kB)
Downloading requests_toolbelt-1.0.0-py2.py3-none-any.whl (54 kB)
Downloading importlib_metadata-8.5.0-py3-none-any.whl (26 kB)
Downloading oauthlib-3.2.2-py3-none-any.whl (151 kB)
Downloading pywin32_ctypes-0.2.3-py3-none-any.whl (30 kB)
Downloading importlib_resources-6.4.5-py3-none-any.whl (36 kB)
Downloading jaraco.classes-3.4.0-py3-none-any.whl (6.8 kB)
Downloading jaraco.context-6.0.1-py3-none-any.whl (6.8 kB)
Downloading jaraco.functools-4.0.2-py3-none-any.whl (9.9 kB)
Downloading zipp-3.20.1-py3-none-any.whl (9.0 kB)
Downloading backports.tarfile-1.2.0-py3-none-any.whl (30 kB)
Downloading more_itertools-10.5.0-py3-none-any.whl (60 kB)
Installing collected packages: zipp, pywin32-ctypes, oauthlib, more-itertools, backports.tarfile, requests-toolbelt, requests-oauthlib, jaraco.functools, jaraco.context, jaraco.classes, importlib-resources, importlib-metadata, keyring
Successfully installed backports.tarfile-1.2.0 importlib-metadata-8.5.0 importlib-resources-6.4.5 jaraco.classes-3.4.0 jaraco.context-6.0.1 jaraco.functools-4.0.2 keyring-25.3.0 more-itertools-10.5.0 oauthlib-3.2.2 pywin32-ctypes-0.2.3 requests-oauthlib-2.0.0 requests-toolbelt-1.0.0 zipp-3.20.1
Photini’s spelling checker may require some other files to be installed. See the pyenchant documentation for platform specific instructions.
One optional dependency that cannot be installed with pip is FFmpeg. This is used to read metadata from video files. Linux & MacOS users can install it with the system package manager, but installing it on Windows is non-trivial.
Additional users
If you have installed Photini in a virtual environment then other users should be able to run the photini command using its full path.
(On Windows you will need to share the virtual environment top level directory first.
Only read permission is needed.)
sarah@mint22:~$ /home/jim/photini/bin/photini
C:\Users\Sarah>..\Jim\photini\Scripts\photini.exe
This is not a very convenient way to run Photini, so most users will want to add it to their start / application menu:
sarah@mint22:~$ /home/jim/photini/bin/photini-post-install
Creating /tmp/tmplavuaj12/photini.desktop
Installing /tmp/tmplavuaj12/photini.desktop
 to /home/sarah/.local/share/applications
C:\Users\Sarah>..\Jim\photini\Scripts\photini-post-install.exe
Creating C:\Users\Sarah\AppData\Roaming\Microsoft\Windows\Start Menu\Photini
Writing C:\Users\Sarah\Desktop\Photini.lnk
Writing C:\Users\Sarah\AppData\Roaming\Microsoft\Windows\Start Menu\Photini\Photini.lnk
Writing C:\Users\Sarah\AppData\Roaming\Microsoft\Windows\Start Menu\Photini\Photini documentation.url
Updating registry
Writing HKEY_CURRENT_USER\Software\Microsoft\Windows\CurrentVersion\App Paths\photini.exe
Writing HKEY_CURRENT_USER\Software\Classes\Applications\photini.exe
To install Photini menu shortcuts for all users (not recommended) you can run the post install command as root (Linux/MacOS) or in a command window run as administrator (Windows). It is important to use the full path to the post install command:
(photini) jim@mint22:~$ sudo /home/jim/photini/bin/photini-post-install
Creating /tmp/tmpkbuvvzs6/photini.desktop
Installing /tmp/tmpkbuvvzs6/photini.desktop
C:\Windows\system32>c:\Users\Jim\photini\Scripts\photini-post-install.exe
Creating C:\ProgramData\Microsoft\Windows\Start Menu\Photini
Writing C:\Users\Public\Desktop\Photini.lnk
Writing C:\ProgramData\Microsoft\Windows\Start Menu\Photini\Photini.lnk
Writing C:\ProgramData\Microsoft\Windows\Start Menu\Photini\Photini documentation.url
Updating registry
Writing HKEY_LOCAL_MACHINE\Software\Microsoft\Windows\CurrentVersion\App Paths\photini.exe
Writing HKEY_LOCAL_MACHINE\Software\Classes\Applications\photini.exe
Uninstalling Photini
Before removing Photini you should use the photini-post-install command to remove it from the start / application menu:
(photini) jim@mint22:~$ photini-post-install --remove
Deleting /home/jim/.local/share/applications/photini.desktop
(photini) C:\Users\Jim>photini-post-install --remove
Deleting C:\Users\Jim\Desktop\Photini.lnk
Deleting C:\Users\Jim\AppData\Roaming\Microsoft\Windows\Start Menu\Photini\Photini.lnk
Deleting C:\Users\Jim\AppData\Roaming\Microsoft\Windows\Start Menu\Photini\Photini documentation.url
Deleting C:\Users\Jim\AppData\Roaming\Microsoft\Windows\Start Menu\Photini
Updating registry
Deleting HKEY_CURRENT_USER\Software\Classes\Applications\photini.exe
Deleting HKEY_CURRENT_USER\Software\Microsoft\Windows\CurrentVersion\App Paths\photini.exe
If you used a virtual environment you can simply delete the top level directory created when setting up the virtual environment. Otherwise you can use pip to uninstall Photini and as many of its dependencies as you want to remove:
(photini) jim@mint22:~$ pip uninstall photini exiv2
Found existing installation: Photini 2024.8.2
Uninstalling Photini-2024.8.2:
  Would remove:
    /home/jim/photini/bin/photini
    /home/jim/photini/bin/photini-configure
    /home/jim/photini/bin/photini-post-install
    /home/jim/photini/lib/python3.12/site-packages/Photini-2024.8.2.dist-info/*
    /home/jim/photini/lib/python3.12/site-packages/photini/*
Proceed (Y/n)? y
  Successfully uninstalled Photini-2024.8.2
Found existing installation: exiv2 0.17.0
Uninstalling exiv2-0.17.0:
  Would remove:
    /home/jim/photini/lib/python3.12/site-packages/exiv2-0.17.0.dist-info/*
    /home/jim/photini/lib/python3.12/site-packages/exiv2.libs/libINIReader-cec0f2f5.so.0
    /home/jim/photini/lib/python3.12/site-packages/exiv2.libs/libbrotlicommon-6ce2a53c.so.1.0.6
    /home/jim/photini/lib/python3.12/site-packages/exiv2.libs/libbrotlidec-811d1be3.so.1.0.6
    /home/jim/photini/lib/python3.12/site-packages/exiv2.libs/libcom_err-bb8268a4.so.2.1
    /home/jim/photini/lib/python3.12/site-packages/exiv2.libs/libcrypt-52aca757.so.1.1.0
    /home/jim/photini/lib/python3.12/site-packages/exiv2.libs/libcrypto-401bea5d.so.1.1.1k
    /home/jim/photini/lib/python3.12/site-packages/exiv2.libs/libcurl-bbcbc527.so.4.5.0
    /home/jim/photini/lib/python3.12/site-packages/exiv2.libs/libgssapi_krb5-83c4f835.so.2.2
    /home/jim/photini/lib/python3.12/site-packages/exiv2.libs/libidn2-2f4a5893.so.0.3.6
    /home/jim/photini/lib/python3.12/site-packages/exiv2.libs/libinih-520f2841.so.0
    /home/jim/photini/lib/python3.12/site-packages/exiv2.libs/libk5crypto-99a2d4ba.so.3.1
    /home/jim/photini/lib/python3.12/site-packages/exiv2.libs/libkeyutils-2777d33d.so.1.6
    /home/jim/photini/lib/python3.12/site-packages/exiv2.libs/libkrb5-2dfb1625.so.3.3
    /home/jim/photini/lib/python3.12/site-packages/exiv2.libs/libkrb5support-d61d84d2.so.0.1
    /home/jim/photini/lib/python3.12/site-packages/exiv2.libs/liblber-2-a32c7900.4.so.2.10.9
    /home/jim/photini/lib/python3.12/site-packages/exiv2.libs/libldap-2-89849551.4.so.2.10.9
    /home/jim/photini/lib/python3.12/site-packages/exiv2.libs/libnghttp2-15973f3b.so.14.17.0
    /home/jim/photini/lib/python3.12/site-packages/exiv2.libs/libpcre2-8-516f4c9d.so.0.7.1
    /home/jim/photini/lib/python3.12/site-packages/exiv2.libs/libpsl-99becdd3.so.5.3.1
    /home/jim/photini/lib/python3.12/site-packages/exiv2.libs/libsasl2-7de4d792.so.3.0.0
    /home/jim/photini/lib/python3.12/site-packages/exiv2.libs/libselinux-64a010fa.so.1
    /home/jim/photini/lib/python3.12/site-packages/exiv2.libs/libssh-8f1ecd37.so.4.8.7
    /home/jim/photini/lib/python3.12/site-packages/exiv2.libs/libssl-52849bc7.so.1.1.1k
    /home/jim/photini/lib/python3.12/site-packages/exiv2.libs/libunistring-05abdd40.so.2.1.0
    /home/jim/photini/lib/python3.12/site-packages/exiv2/*
Proceed (Y/n)? y
  Successfully uninstalled exiv2-0.17.0
(photini) C:\Users\Jim>pip uninstall photini exiv2
Found existing installation: Photini 2023.10.0
Uninstalling Photini-2023.10.0:
  Would remove:
    c:\users\jim\photini\lib\site-packages\photini-2023.10.0.dist-info\*
    c:\users\jim\photini\lib\site-packages\photini\*
    c:\users\jim\photini\scripts\photini-configure.exe
    c:\users\jim\photini\scripts\photini-post-install.exe
    c:\users\jim\photini\scripts\photini.exe
Proceed (Y/n)? y
  Successfully uninstalled Photini-2023.10.0
Found existing installation: exiv2 0.14.1
Uninstalling exiv2-0.14.1:
  Would remove:
    c:\users\jim\photini\lib\site-packages\exiv2-0.14.1.dist-info\*
    c:\users\jim\photini\lib\site-packages\exiv2\*
Proceed (Y/n)? y
  Successfully uninstalled exiv2-0.14.1
Updating Photini
When a new release of Photini is issued you can easily update your installation with pip. If you installed Photini in a virtual environment then you need to activate the virtual environment before upgrading:
jim@mint22:~$ source photini/bin/activate
(photini) jim@mint22:~$ pip install -U photini
Requirement already satisfied: photini in ./photini/lib/python3.12/site-packages (2024.5.0)
Collecting photini
  Downloading Photini-2024.8.2-py3-none-any.whl.metadata (11 kB)
Requirement already satisfied: appdirs>=1.3 in ./photini/lib/python3.12/site-packages (from photini) (1.4.4)
Requirement already satisfied: cachetools>=3.0 in ./photini/lib/python3.12/site-packages (from photini) (5.5.0)
Requirement already satisfied: chardet>=3.0 in /usr/lib/python3/dist-packages (from photini) (5.2.0)
Requirement already satisfied: exiv2>=0.16 in ./photini/lib/python3.12/site-packages (from photini) (0.17.0)
Requirement already satisfied: filetype>=1.0 in /usr/lib/python3/dist-packages (from photini) (1.2.0)
Requirement already satisfied: Pillow>=2.0 in /usr/lib/python3/dist-packages (from photini) (10.2.0)
Requirement already satisfied: requests>=2.4 in /usr/lib/python3/dist-packages (from photini) (2.31.0)
Downloading Photini-2024.8.2-py3-none-any.whl (418 kB)
   ━━━━━━━━━━━━━━━━━━━━━━━━━━━━━━━━━━━━━━━ 418.1/418.1 kB 355.0 kB/s eta 0:00:00
Installing collected packages: photini
  Attempting uninstall: photini
    Found existing installation: Photini 2024.5.0
    Uninstalling Photini-2024.5.0:
      Successfully uninstalled Photini-2024.5.0
Successfully installed photini-2024.8.2
C:\Users\Jim>photini\Scripts\activate.bat

(photini) C:\Users\Jim>pip install -U photini
Requirement already satisfied: photini in c:\users\jim\photini\lib\site-packages (2024.5.0)
Collecting photini
  Downloading Photini-2024.8.2-py3-none-any.whl.metadata (11 kB)
Requirement already satisfied: appdirs>=1.3 in c:\users\jim\photini\lib\site-packages (from photini) (1.4.4)
Requirement already satisfied: cachetools>=3.0 in c:\users\jim\photini\lib\site-packages (from photini) (5.5.0)
Requirement already satisfied: chardet>=3.0 in c:\users\jim\photini\lib\site-packages (from photini) (5.2.0)
Requirement already satisfied: exiv2>=0.16 in c:\users\jim\photini\lib\site-packages (from photini) (0.17.0)
Requirement already satisfied: filetype>=1.0 in c:\users\jim\photini\lib\site-packages (from photini) (1.2.0)
Requirement already satisfied: Pillow>=2.0 in c:\users\jim\photini\lib\site-packages (from photini) (10.4.0)
Requirement already satisfied: requests>=2.4 in c:\users\jim\photini\lib\site-packages (from photini) (2.32.3)
Requirement already satisfied: charset-normalizer<4,>=2 in c:\users\jim\photini\lib\site-packages (from requests>=2.4->photini) (3.3.2)
Requirement already satisfied: idna<4,>=2.5 in c:\users\jim\photini\lib\site-packages (from requests>=2.4->photini) (3.8)
Requirement already satisfied: urllib3<3,>=1.21.1 in c:\users\jim\photini\lib\site-packages (from requests>=2.4->photini) (2.2.3)
Requirement already satisfied: certifi>=2017.4.17 in c:\users\jim\photini\lib\site-packages (from requests>=2.4->photini) (2024.8.30)
Downloading Photini-2024.8.2-py3-none-any.whl (418 kB)
Installing collected packages: photini
  Attempting uninstall: photini
    Found existing installation: Photini 2024.5.0
    Uninstalling Photini-2024.5.0:
      Successfully uninstalled Photini-2024.5.0
Successfully installed photini-2024.8.2
The -U option tells pip to update Photini to the latest available version.
If you upgrade Python you shouldn’t need to reinstall Photini or its dependencies if only the patch level changes (e.g. 3.8.9 to 3.8.10). After a more significant Python upgrade (e.g. 3.7.x to 3.8.y) you will need to do a fresh installation of Photini and its dependencies.
Dependency details
These lists of dependencies may be useful to Linux or MacOS users who prefer to use their system package manager to install them instead of pip. Note that in some cases you have a choice of packages, as discussed in the notes below each table.
Different operating systems have different names for the same packages. If you run into problems, please let me know (email jim@jim-easterbrook.me.uk) and once we’ve worked out what needs to be done I’ll be able to improve these instructions.
Essential dependencies
These are all required for Photini to be usable.
Package |
Minimum version |
Typical Linux package name |
PyPI package name |
|---|---|---|---|
3.6 |
|
||
PyQt [1] |
5.11 |
|
|
PySide2 [1] |
5.11.0 |
|
PySide2 |
PySide6 [1] |
6.2.0 |
|
PySide6 |
QtWebEngine [2] |
|
PyQtWebEngine |
|
0.14.0 |
exiv2 |
||
appdirs |
1.3 |
|
appdirs |
2.0 |
|
pillow |
|
2.4 |
|
requests |
[1] PyQt, PySide2, and PySide6 are Python interfaces to the Qt GUI framework. Photini can use any of them (although PyQt is preferred), so you can install whichever one you prefer that is available for your operating system. (Note that PyQt6 and PySide6 are not compatible with Windows versions earlier than Windows 10.) If more than one of them is installed you can choose which one Photini uses in its configuration
[2] Photini needs the Python interface to QtWebEngine. This is included in PySide6 and some PyQt or PySide2 installations, otherwise you need to install a separate package.
Optional dependencies
Some of Photini’s features are optional - if you don’t install these packages Photini will work but the relevant feature will not be available.
Linux package manager names will probably have python- or python3- prefixes.
Feature |
Dependencies |
|---|---|
Spell check[1] |
pyenchant 2.0+ |
Flickr upload |
requests-oauthlib 1.0+, requests-toolbelt 0.9+, keyring 7.0+ |
Ipernity upload |
requests-toolbelt 0.9+, keyring 7.0+ |
Pixelfed upload |
requests-oauthlib 1.0+, requests-toolbelt 0.9+, keyring 7.0+ |
Thumbnail creation[2] |
|
Import photos from camera[3] |
python3-gphoto2 1.8+ |
Import GPS logger file |
gpxpy 1.3.5+ |
[1] Pyenchant requires a C library and dictionaries to be installed. See the pyenchant documentation for detailed instructions.
[2] FFmpeg is needed to generate thumbnails for video files, but it can also make them for some still image formats.
[3]Photini can import pictures from any directory on your computer (e.g. a memory card) but on Linux and MacOS systems it can also import directly from a camera if python-gphoto2 is installed.
Special installations
There are some circumstances where installing Photini from the Python Package Index (PyPI) with pip is not suitable. If you need easy access to the source files, for example to work on translating the user interface into another language, then you should install the development version.
Development version
To install the development version you can use git to clone the GitHub repository or download it as a .zip or .tar.gz file and then unpack it. Then set your working directory to the Photini top level directory before continuing.
You can run Photini without installing it, using the run_photini.py script:
$ python3 src/run_photini.py
This can be useful during development as the script should also work within an IDE.
The development version can be built and installed using pip:
$ pip3 install . --user
If you’d like to test or use one of Photini’s translation files you will need to update the translations before installing or running Photini:
$ python3 utils/lang_update.py
$ pip3 install . --user
This requires the Qt “linguist” software to be installed. See Testing your translation for more information about using translations.
Troubleshooting
If you ever have problems running Photini the first thing to do is to run it in a command window. If you installed Photini in a virtual environment then activate that environment first. Run the Photini program as a Python module. If it fails to run you should get some diagnostic information:
jim@brains:~$ source /home/jim/photini/bin/activate
(photini) jim@brains:~$ python3 -m photini -v
C:\Users\Jim>photini\Scripts\activate.bat

(photini) C:\Users\Jim>python -m photini -v
Note the use of the -v option to increase the verbosity of Photini’s message logging.
This option can be repeated for even more verbosity.
To find out what version of Photini and some of its dependencies you are using, run it with the --version option:
(photini) jim@mint22:~$ python -m photini --version
ffmpeg or ffprobe not found
Photini 2024.8.2
  Python 3.12.3 (main, Jul 31 2024, 17:43:48) [GCC 13.2.0]
  python-exiv2 0.17.0, exiv2 0.28.3
  PyQt 5.15.10, Qt 5.15.13
  system locale en-GB, locales: en-GB en-Latn-GB en en-US en-Latn-US
  PyEnchant 3.2.2
  styles: cleanlooks, gtk2, cde, motif, plastique, Windows, Fusion
  using style: fusion
(photini) C:\Users\Jim>python -m photini --version
ffmpeg or ffprobe not found
Photini 2024.8.2
  Python 3.8.10 (tags/v3.8.10:3d8993a, May  3 2021, 11:48:03) [MSC v.1928 64 bit (AMD64)]
  python-exiv2 0.17.0, exiv2 0.28.3
  PyQt 5.15.11, Qt 5.15.2
  system locale en-GB, locales: en-US
  PyEnchant 3.2.2
  styles: windowsvista, Windows, Fusion
  using style: windowsvista
This information is useful if you need to email me (jim@jim-easterbrook.me.uk) with any problems you have running Photini.
Mailing list
For more general discussion of Photini (e.g. release announcements, questions about using it, problems with installing, etc.) there is an email list or forum hosted on Google Groups. You can view previous messages and ask to join the group at https://groups.google.com/forum/#!forum/photini.
Photini documentation
If you would like to have a local copy of the Photini documentation, and have downloaded or cloned the source files, you can install Sphinx and associated packages and then “compile” the documentation:
$ pip3 install -r src/doc/requirements.txt
$ python3 utils/build_docs.py
Open doc/html/index.html with a web browser to read the local documentation.
Comments or questions? Please subscribe to the Photini mailing list https://groups.google.com/forum/#!forum/photini and let us know.